
外观
Alist部署教程及WebDAV
参考资料
AList 官方文档:Home | AList文档
WebDAV 参考:WebDAV | AList文档
部署教程
一键脚本安装
默认安装在 /opt/alist中。
# Install
curl -fsSL "https://alist.nn.ci/v3.sh" -o v3.sh && bash v3.sh install
# update
curl -fsSL "https://alist.nn.ci/v3.sh" -o v3.sh && bash v3.sh update
# Uninstall
curl -fsSL "https://alist.nn.ci/v3.sh" -o v3.sh && bash v3.sh uninstall
自定义路径
安装在/root/alist中。
# Install
curl -fsSL "https://alist.nn.ci/v3.sh" -o v3.sh && bash v3.sh install /root
# update
curl -fsSL "https://alist.nn.ci/v3.sh" -o v3.sh && bash v3.sh update /root
# Uninstall
curl -fsSL "https://alist.nn.ci/v3.sh" -o v3.sh && bash v3.sh uninstall /root- 启动:
systemctl start alist - 关闭:
systemctl stop alist - 状态:
systemctl status alist - 重启:
systemctl restart alist
Docker 安装
docker run -d \
  --restart=unless-stopped \
  -v /etc/alist:/opt/alist/data \
  -p 5244:5244 \
  -e PUID=0 \
  -e PGID=0 \
  -e UMASK=022 \
  -e TZ=Asia/Shanghai \
  -e RUN_ARIA2=true \
  --name="alist" \
  xhofe/alist:latest
反代
- 安装
nginx
apt install nginx- 编辑
nginx.conf
vim /etc/nginx/nginx.conf
nano /etc/nginx/nginx.confnginx.conf内容如下
# 定义 Nginx 的主配置文件
user  www-data;
worker_processes  auto;

error_log  /var/log/nginx/error.log warn;
pid        /var/run/nginx.pid;

events {
    worker_connections  1024;
}

http {
    include       /etc/nginx/mime.types;
    default_type  application/octet-stream;

    log_format  main  '$remote_addr - $remote_user [$time_local] "$request" '
                      '$status $body_bytes_sent "$http_referer" '
                      '"$http_user_agent" "$http_x_forwarded_for"';

    access_log  /var/log/nginx/access.log  main;

    sendfile        on;
    tcp_nopush      on;
    tcp_nodelay     on;
    keepalive_timeout  65;
    types_hash_max_size 2048;

    # 配置虚拟主机 example.com
    server {
        listen 80;
        server_name example.com;

        # 强制 HTTPS 跳转
        return 301 https://$host$request_uri;
    }

    server {
        listen 443 ssl http2;
        server_name example.com;

        # SSL 配置
        ssl_certificate      /alist/ssl/example.com.pem;
        ssl_certificate_key  /alist/ssl/example.com.key;

        # SSL 安全配置(可选,推荐)
        ssl_protocols TLSv1.2 TLSv1.3;
        ssl_ciphers HIGH:!aNULL:!MD5;
        ssl_prefer_server_ciphers on;

        # 日志配置
        access_log /var/log/nginx/example.com.access.log;
        error_log  /var/log/nginx/example.com.error.log;

        # 反向代理配置
        location / {
            proxy_pass http://127.0.0.1:5244;  # 反代到本地 8080 端口
            proxy_set_header Host $host;
            proxy_set_header X-Real-IP $remote_addr;
            proxy_set_header X-Forwarded-For $proxy_add_x_forwarded_for;
            proxy_set_header X-Forwarded-Proto $scheme;
        }
    }
}- 重新加载
nginx.conf
systemctl reload nginx.service获取密码
一键脚本安装
需要进入脚本安装 AList 的目录文件夹內执行如下命令
3.25.0以上版本将密码改成加密方式存储的hash值,无法直接反算出密码,如果忘记了密码只能通过重新 随机生成 或者 手动设置
# 随机生成一个密码
./alist admin random
# 手动设置一个密码,`NEW_PASSWORD`是指你需要设置的密码
./alist admin set NEW_PASSWORD
Docker 安装
3.25.0以上版本将密码改成加密方式存储的hash值,无法直接反算出密码,如果忘记了密码只能通过重新随机生成或者手动设置
# 随机生成一个密码
docker exec -it alist ./alist admin random
# 手动设置一个密码,`NEW_PASSWORD`是指你需要设置的密码
docker exec -it alist ./alist admin set NEW_PASSWORD
挂载本机储存
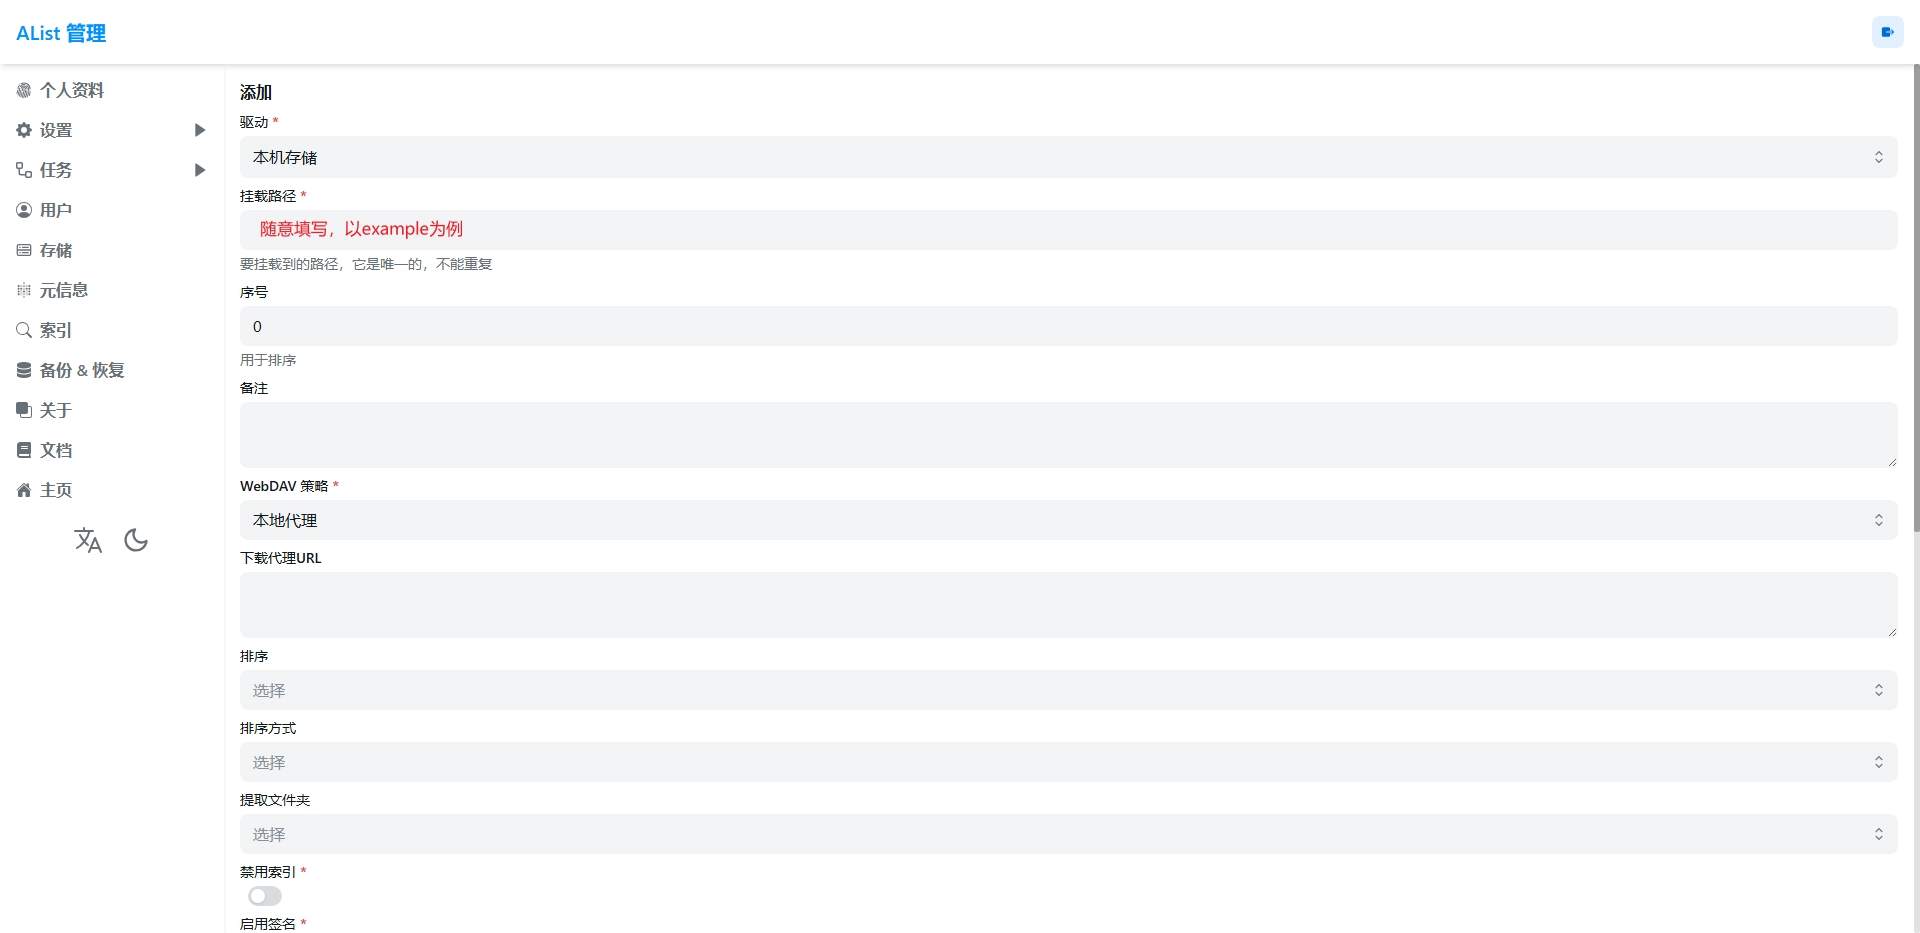
一键脚本安装
- 创建目录
目录随意创建,放在一个自己知道的位置即可
# 默认安装
mkdir /opt/alist/cloud
chmod 777 /opt/alist/cloud

#自定义安装
mkdir /root/alist/cloud
chmod 777 /root/alist/cloud- 挂载目录
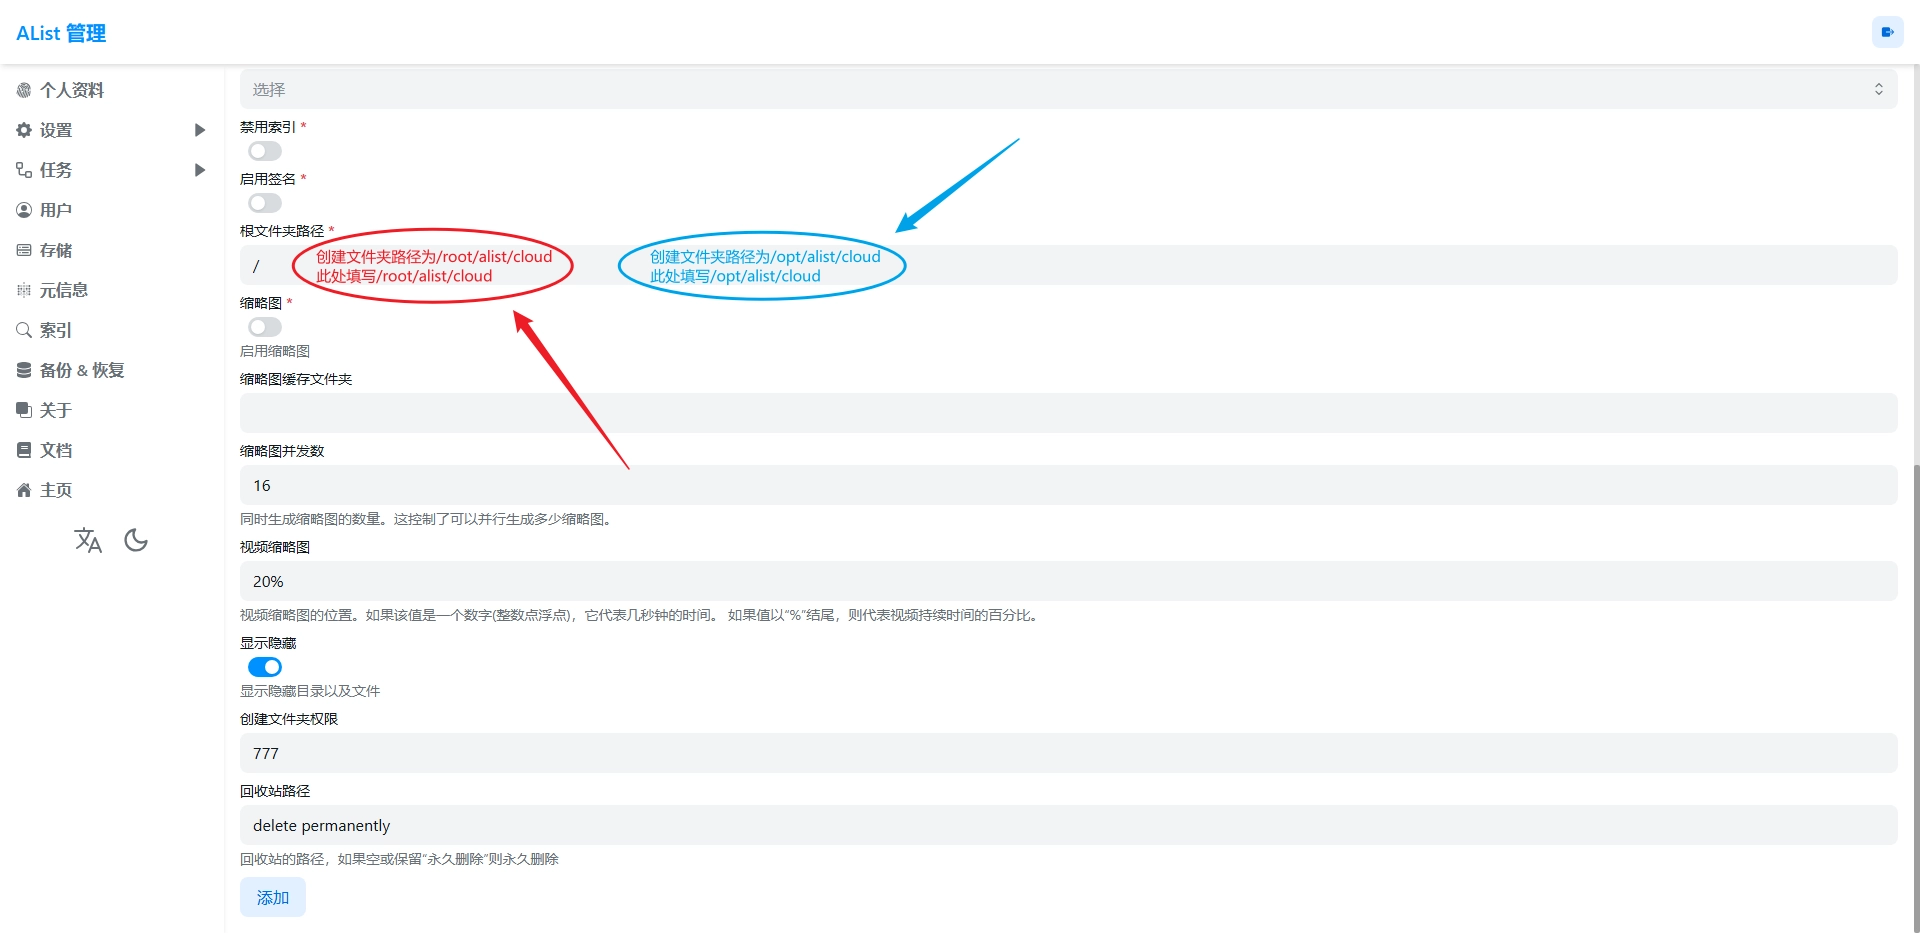
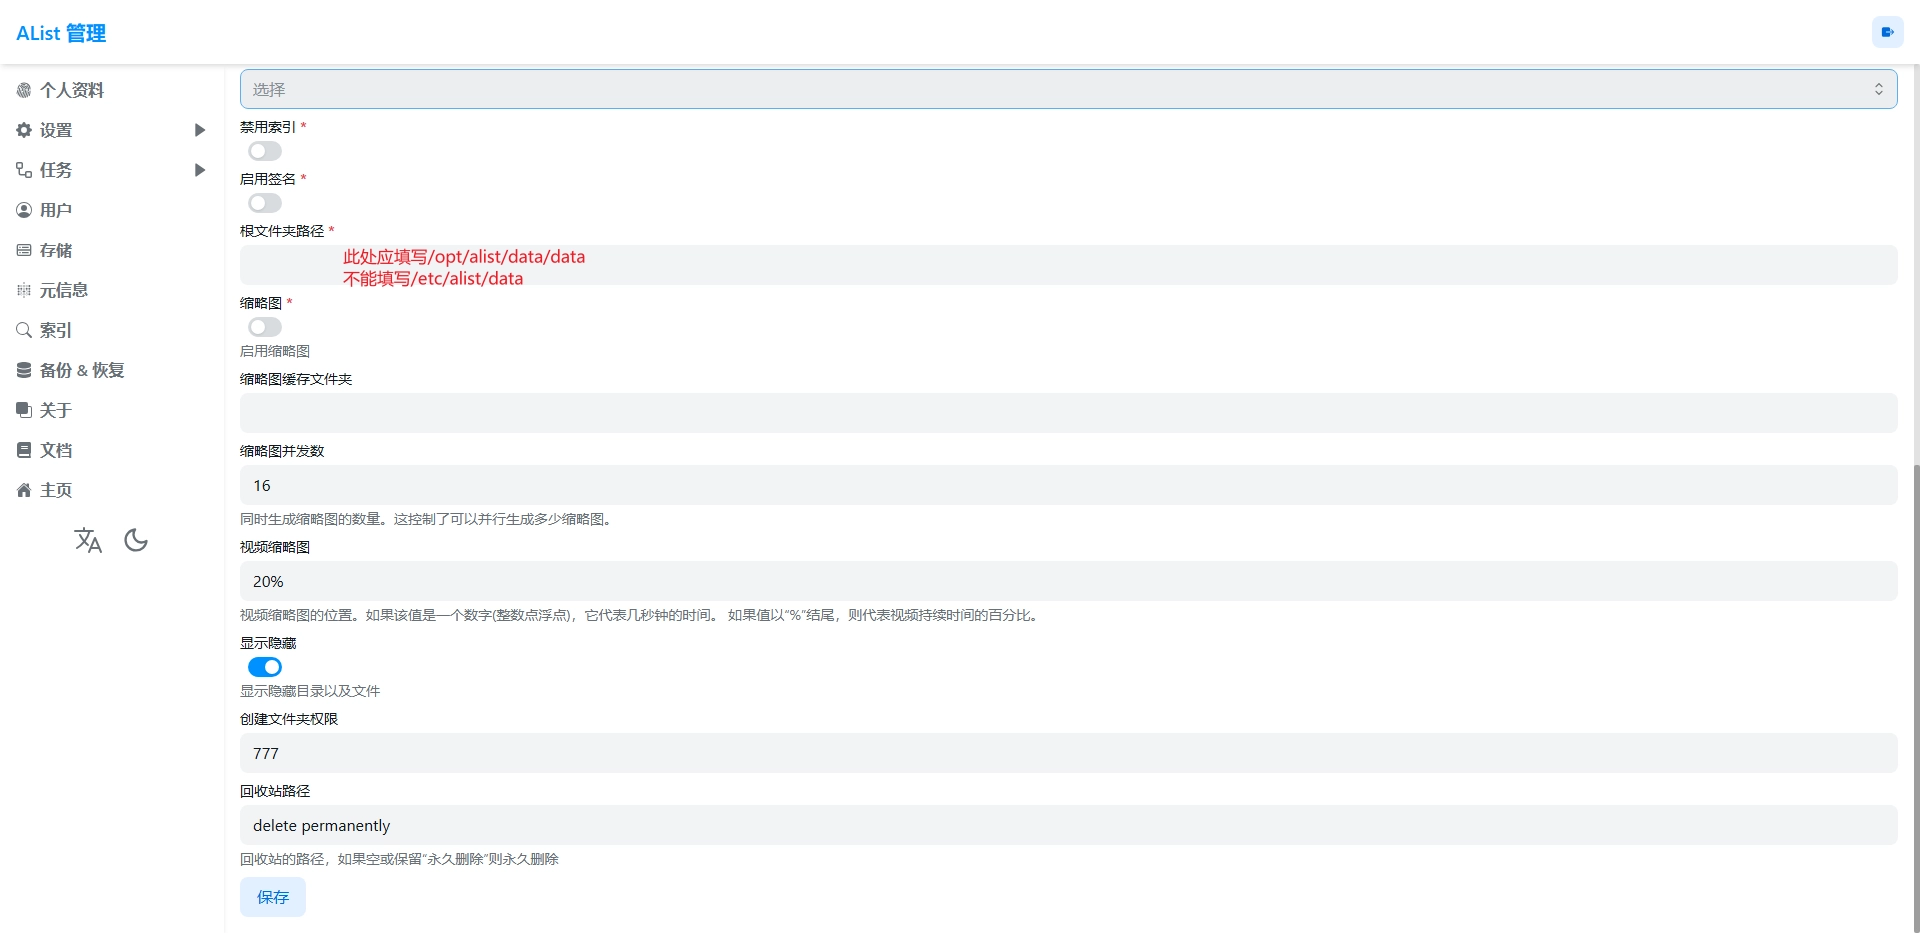
Docker 安装
Docker 安装 Alist 时,在容器内只能看到/opt/alist/data目录,假设要挂载本机/etc/alist目录下的data目录,应按照如下方式填写根文件夹路径。
WebDAV
| Name | Value |
|---|---|
| Url | http[s]://domain:port/dav/ |
| Host | domain |
| 路径 | dav |
| 协议 | http/https |
| 端口 | 与网页端一致 |
| WebDAV用户名 | 与网页端用户名一致 |
| WebDAV密码 | 与网页端密码一致 |
主要用于 Floccus 同步书签和标签