
外观
使用Nginx搭建文件下载站(基于宝塔面板)
参考资料
提升网站安全-访问限制篇:宝塔公众号
参考文章:巧用Nginx搭建文件下载站 | ChenJiehua
参考文章:宝塔面板论坛
参考文章:htpasswd 详解
参考视频:一键搭建个人下载站
环境描述
服务器版本:Debian 12;
宝塔面板版本:9.0.0;
Nginx版本:1.24;
使用极速方式安装LNMP环境。
简易下载站搭建
简易下载站搭建只需要在宝塔面板中改一下网站的配置文件,在配置文件中加入如下代码:
    # 要将如下代码注释
    index index.php index.html index.htm default.php default.htm default.html;

	# 并加入如下代码
	index off;

    location /
    {
        # /www/wwwroot/example 为储存路径
        root /www/wwwroot/example;
        autoindex on;
        autoindex_format html;
        autoindex_exact_size off;
        autoindex_localtime on;
        charset utf-8,gbk;
}- autoindex_format
html|xml|json|jsonp:以指定格式返回文件列表; - autoindex_exact_size
on|off:off 不显示详细字节大小,会自动换算为GB、MB、KB显示; - autoindex_localtime
on|off:on 使用本地时间,默认是UTC; - charset
utf-8|gbk:文件列表编码,加入已正常显示中文。
下载站美化
Nginx 部署 fancyindex 模块
- 软件包存放地址
/home/nginx_module/
- 操作步骤
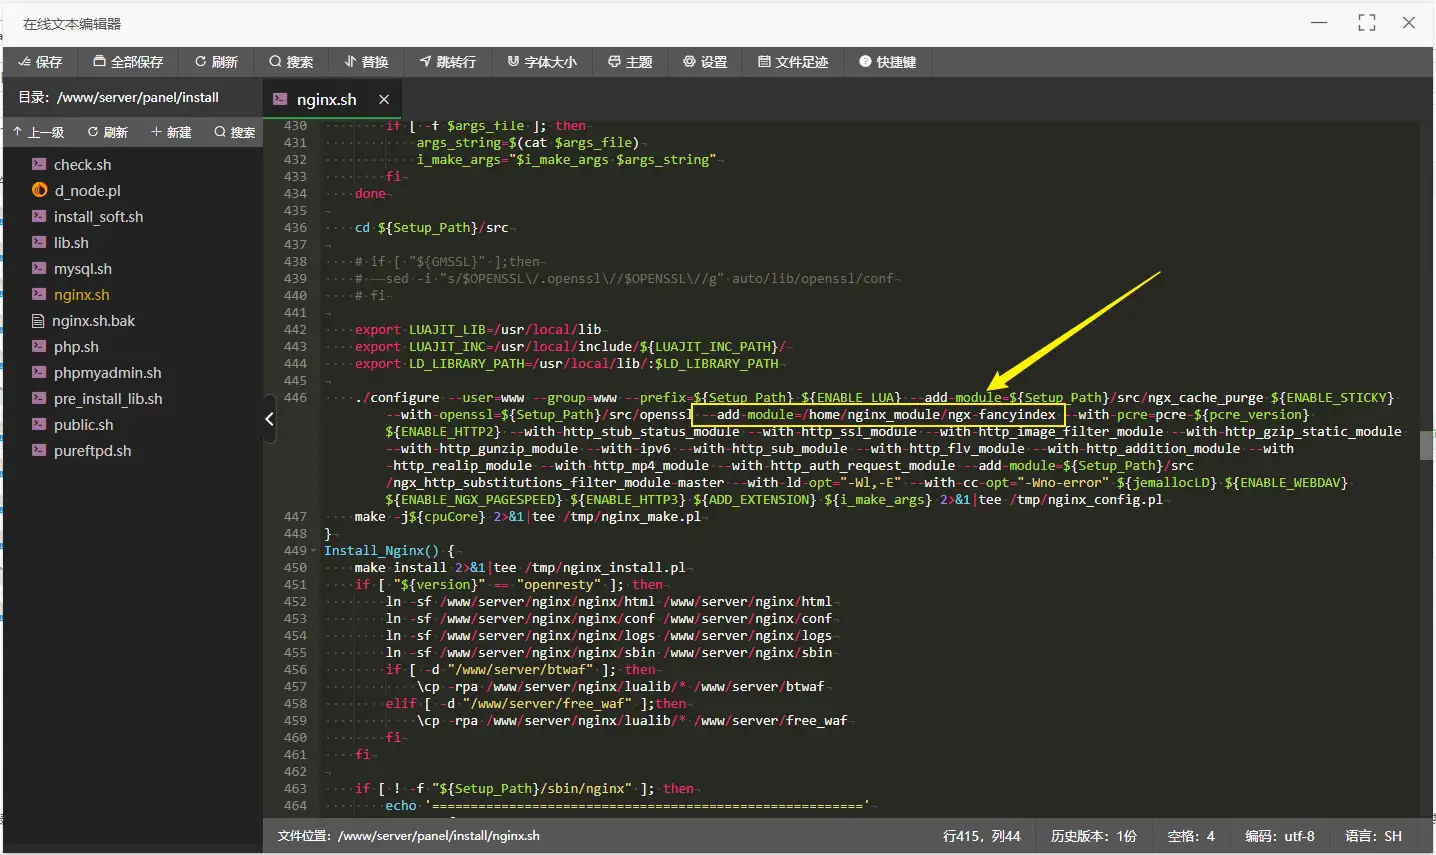
mkdir -p /home/nginx_module/

cd  /home/nginx_module/

git clone https://github.com/aperezdc/ngx-fancyindex.git
提示
如果在git时速度较慢,可以使用Github Proxy 文件代理加速进行加速。
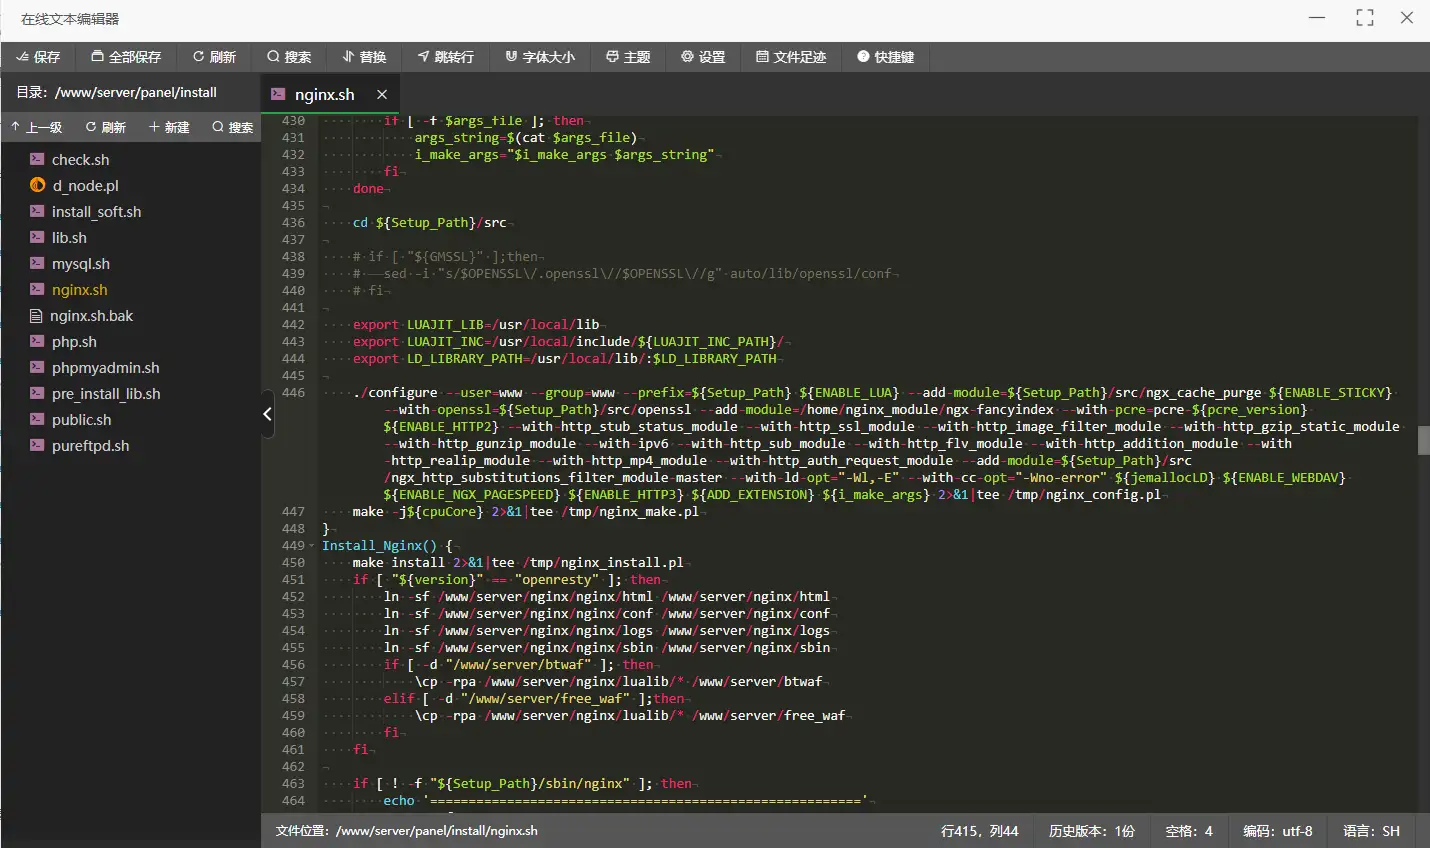
cd  /www/server/panel/install/

cp nginx.sh nginx.sh.bak

wget http://download.bt.cn/install/0/nginx.sh

vim nginx.sh
提示
由于/www/server/panel/install/目录下,存在nginx.sh文件,要先对其备份,然后在下载新的nginx.sh文件。
然后对nginx.sh文件做出如下更改。
bash nginx.sh install 1.24等待安装完成,服务器的性能约好安装速度越快,实际安装速度也很快的。
美化下载站
安装成功后在宝塔面板中改一下网站的配置文件,在配置文件中加入如下代码:
    # 要将如下代码注释
    index index.php index.html index.htm default.php default.htm default.html;

    location /
    {
        root  /www/wwwroot/example.com;
        fancyindex on;
        fancyindex_exact_size off;
        fancyindex_localtime on;
        fancyindex_time_format "%Y-%m-%d %H:%M:%S";
        charset utf-8,gbk;
}- fancyindex_default_sort
name|size|date|name_desc|size_desc|date_desc:排序方式,默认 name; - fancyindex_exact_size
on|off:与autoindex_exact_size一样,显示精确大小(Byte)或粗略大小(GB, MB, KB); - fancyindex_localtime:与
autoindex_localtime一样,显示本地时间; - fancyindex_time_format:指定时间显示格式。
深度美化下载站(Nginx-Fancyindex-Theme)
下载Nginx-Fancyindex-Theme,将下载Nginx-Fancyindex-Theme-light或Nginx-Fancyindex-Theme-dark复制到/www/wwwroot/example.com目录下,然后修改配置文件:
注
Nginx-Fancyindex-Theme-light
    # 要将如下代码注释
    index index.php index.html index.htm default.php default.htm default.html;

    location /
    {
        root  /www/wwwroot/example.com;
        fancyindex on;
        fancyindex_exact_size off;
        fancyindex_localtime on;
        fancyindex_time_format "%Y-%m-%d %H:%M:%S";
        fancyindex_header "/Nginx-Fancyindex-Theme-light/header.html";
        fancyindex_footer "/Nginx-Fancyindex-Theme-light/footer.html";
        fancyindex_ignore "Nginx-Fancyindex-Theme-light";
        charset utf-8,gbk;
    }
注
Nginx-Fancyindex-Theme-dark
    # 要将如下代码注释
    index index.php index.html index.htm default.php default.htm default.html;

    location /
    {
        root  /www/wwwroot/example.com;
        fancyindex on;
        fancyindex_exact_size off;
        fancyindex_localtime on;
        fancyindex_time_format "%Y-%m-%d %H:%M:%S";
        fancyindex_header "/Nginx-Fancyindex-Theme-dark/header.html";
        fancyindex_footer "/Nginx-Fancyindex-Theme-dark/footer.html";
        fancyindex_ignore "Nginx-Fancyindex-Theme-dark";
        charset utf-8,gbk;
}- fancyindex_footer、fancyindex_header:自定义页面的 header 和 footer 样式;
- fancyindex_ignore:隐藏指定的文件(仅隐藏,仍然可以访问);
basic 认证
如果文件不想任何人都可以下载,可以给 Nginx 设置访问密码。可以通过htpasswd生成在线生成,也可通过如下方式生成。
htpasswd 安装
- 对于 Debian 运行如下命令安装:
apt update
apt install apache2-utils -y- 安装完成后,检查是否可用:
htpasswd -v创建用户
- 创建一个
.htpasswd文件并添加用户
# /www/wwwroot/这个路径随机但要记住
htpasswd -c /www/wwwroot/.htpasswd youruser
# 会提示输入密码。`-c`参数用于**创建**文件(如果已经存在,不要用 `-c`,否则会覆盖)。- 追加新用户
htpasswd /www/wwwroot/.htpasswd newuser- 查看
.htpasswd内容
cat /www/wwwroot/.htpasswd更改 Nginx 配置
- 简单下载站
    # 要将如下代码注释
    index index.php index.html index.htm default.php default.htm default.html;

	# 并加入如下代码
	index off;

    location /
    {
        root /www/wwwroot/example;
        autoindex on;
        autoindex_format html;
        autoindex_exact_size off;
        autoindex_localtime on;
        charset utf-8,gbk;
	    auth_basic "Authorized";
        auth_basic_user_file /www/wwwroot/.htpasswd; # /www/wwwroot/.htpasswd 要与创建`.htpasswd`时的路径保持一致
}- auth_basic:启用 Basic Auth 认证,访问页面时,会弹出一个登录框。
Authorized是提示信息。 - auth_basic_user_file:指定 存储用户名和密码 的文件路径。
- 美化下载站
    # 要将如下代码注释
    index index.php index.html index.htm default.php default.htm default.html;

    location /
    {
        root  /www/wwwroot/example.com;
        fancyindex on;
        fancyindex_exact_size off;
        fancyindex_localtime on;
        fancyindex_time_format "%Y-%m-%d %H:%M:%S";
        charset utf-8,gbk;
        auth_basic "Authorized";
        auth_basic_user_file /www/wwwroot/.htpasswd; # /www/wwwroot/.htpasswd 要与创建`.htpasswd`时的路径保持一致
}- 深度美化下载站
注
Nginx-Fancyindex-Theme-light
    # 要将如下代码注释
    index index.php index.html index.htm default.php default.htm default.html;

    location /
    {
        root  /www/wwwroot/example.com;
        fancyindex on;
        fancyindex_exact_size off;
        fancyindex_localtime on;
        fancyindex_time_format "%Y-%m-%d %H:%M:%S";
        fancyindex_header "/Nginx-Fancyindex-Theme-light/header.html";
        fancyindex_footer "/Nginx-Fancyindex-Theme-light/footer.html";
        fancyindex_ignore "Nginx-Fancyindex-Theme-light";
        charset utf-8,gbk;
        auth_basic "Authorized";
        auth_basic_user_file /www/wwwroot/.htpasswd; # /www/wwwroot/.htpasswd 要与创建`.htpasswd`时的路径保持一致
    }
注
Nginx-Fancyindex-Theme-dark
    # 要将如下代码注释
    index index.php index.html index.htm default.php default.htm default.html;

    location /
    {
        root  /www/wwwroot/example.com;
        fancyindex on;
        fancyindex_exact_size off;
        fancyindex_localtime on;
        fancyindex_time_format "%Y-%m-%d %H:%M:%S";
        fancyindex_header "/Nginx-Fancyindex-Theme-dark/header.html";
        fancyindex_footer "/Nginx-Fancyindex-Theme-dark/footer.html";
        fancyindex_ignore "Nginx-Fancyindex-Theme-dark";
        charset utf-8,gbk;
        auth_basic "Authorized";
        auth_basic_user_file /www/wwwroot/.htpasswd; # /www/wwwroot/.htpasswd 要与创建`.htpasswd`时的路径保持一致
    }
备注
在上述各配置文件中的root /www/wwwroot/example.com;在不是使用根目录即location /时,可以将root改为alias,区别如下:
- root:将请求的路径附加到指定的路径之后,即 /data -> root /www/wwwroot/example.com = /www/wwwroot/example.com/data;
- alias:直接替换请求的路径,即 /data -> alias /www/wwwroot/example.com/down = /www/wwwroot/example.com;